Huf TPMS Sensor Removal Procedure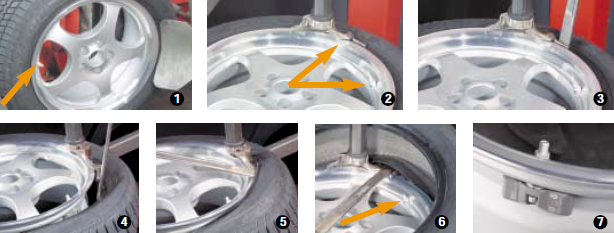 1) Screw valve insert out of valve and let air discharge completely. Remove balancing weights. Press tire off the safety shoulder inside and outside. Please note: Always be sure to apply pressure shoe 180° offset from the valve as the tire electronic unit can otherwise be damaged. 2) Clamp the wheel onto the installation machine. Rub soapy water onto tire bead and rim lip. Please note: Position installation head approximately 15 cm behind the valve to prevent damage to the tire electronic unit. 3) Place level on the tire bead. 4) Lift tire bead with mounting iron/tire shoe over the installation head and pull away. 5) Then pull the lower tire bead away. Please note: Position installation head approximately 15 cm behind the valve and pay attention to ensure that the tire bead does not press onto the tire electronic unit during the removal operation. 6) Perform visual inspection: Check rim, wheel electronic unit, valve body with shoulder seal in assembled condition for damage If the contact points of the wheel electronic unit still rest in the deep well of the rim, it is enough to replace the valve insert. If the contact points of the wheel electronic unit no longer rest in the deep well of the rim, the complete valve must be replaced. Do not treat the TPMS unit with compress air, installation paste, solvents or other cleaning materials. The rim may not be cleaned with high pressure if the tire has been removed and the TPMS unit is installed. Do not scrape the filter surface of the TPMS unit to clean it. Remove dirty only with clean, lint-free cloth. Important information: Do not retighten self-locking mounting screws and collar nuts. Replace valve if:
|